Thursday, August 20, 2015

This page is no longer active

Doesn't it annoy you when you get this error message "This page is no longer active. Please go back to your most recent page" ? This mostly happens when you you have multiple windows open and you have clicked on the home link from the newly opened windows. It seems web server loses track of multiple sessions when home link is clicked from newly opened windows.

I ran into this a while back working for my client. I had developed a pagelet containing a component with links to frequently used transaction. The links were push button and I had used button property to define the target (menu, component, page etc. ) . We encountered "page no longer active" message every now and then. A few weeks later I noticed that when a button was clicked on the pagelet it would open up the target page in the same window but the url had sitename_1 in it. This usually happens when you click on "New Window" from a page and the page opens up a new window. Not sure if this is a bug or it works as designed but having sitename_1 in the same window caused this problem for us because we were clicking on home to get back to the pagelet. I tried using GenerateComponentContentURL to generate a url to transfer but even that included sitename_1. Well, I ended up writing a small peoplecode to overwrite sitename_1 to sitename in the output of GenerateComponentContentURL and then doing the redirect to the target page. Not sure, if this is the best solution but we have not seen this message since.


Wednesday, July 22, 2015

Hiding Portal Header

You may run into this requirement to hide the portal header. Your need may different but I had to hide it for the password recovery site. Modifying portal definition may yield the same result but I found it easier to use a small java script in the html area on the page. Here is the code


if (top.document.getElementById('pthdr2container'))
{
top.document.getElementById('pthdr2container').className = "pthnavbarhide";
}

if (top.document.getElementById('pthnavcontainer'))
{
top.document.getElementById('pthnavcontainer').style.display = "none";
}

P.S. : Keep in mind that the ElementIDs may be different depending upon your tools versions and the stylesheet used. You also need to add  script tags

Monday, July 20, 2015

Debug SSL connection on App Server / Issue with TLS and tools 8.54

 Recently I had trouble installing an ssl cert on the Gateway. The app server log showed usual handshake failure but that was not enough to figure out the issue. After some search on the internet I found out that you can append to Java options to trace ssl connectivity issues in the application server configuration. Here is the text to attach  "-Djavax.net.debug=ssl" . This helped a great deal as the trace pointed out the issue. Server was setup to use TLS only and app server was trying to connect using SSL. App server or Process Scheduler can be forced to use TLS by appending  to the same Java options. After adding "-Dhttps.protocols=TLSv1" to app server configuration connectors loaded successfully.

Thursday, November 13, 2014

Email Addresses in PeopleSoft

PeopleSoft stores email addresses in following tables
  1. PSOPRDEFN
  2. PS_ROLEXLATOPR
  3. PSUSEREMAIL
  4. PS_EMAIL_ADDRESES
First three are used in email notifications and it depends on the application. It is best to update all of these tables when testing a notification process so you don't spam the whole company just in case something goes south.

Wednesday, May 14, 2014

Setting up REN Server with BigIP/ F5 load balancer

Configuring BigIP for REN server is not very complicated. There are just a few steps but you need to make sure you do it right. Troubleshooting becomes more difficult especially when you do not have access to BigIP.

My configuration:
2 web servers  (Load balanced)
2 App Servers

We did not have a dedicated vip for REN server so we used the one that was load balancing web servers. This will slightly change the iRule. So, here are the steps
  1.  Create Ren Server definitions in PeopleSoft for every app server running PSRENSRV
  2. Create cluster definitions in PeopleSoft for every REN server definition  (in my case PSREN1 and PSREN2). I will not get into the pros and cons of setting up multiple clusters or single cluster with multiple members. In my experience I have found multiple clusters each with one member to be better
  3. Set REN server browser URLto your vip:port
  4. Create an iRule in BigIP 
when HTTP_REQUEST {
   if {[HTTP::uri] starts_with "/psren1"}{
       node APPSRVR1 port
     }
  elseif {[HTTP::uri] starts_with "/psren2"}{
       node APPSRVR2 port
}
else {
"you would want to forward request to your web server pool if the request is not for PSREN1 or PREN2. You would not need this step here if you have a dedicated vip for ren server".
   }
}


Clear App, Web, Process Scheduler cache and you are in business

Thursday, August 8, 2013

Report Manager pointing to a different environment after database refresh

The link on the List tab in Report Manager comes from PSRF_REPORT_URL field in PSRF_RINFO_TBL. This field gets populated when you run a report and it is posted to report manager. The API that populates the field uses URI_RPT field value in PS_CDM_DIST_NODE table which stores all the report node related setup data to generate a url to access the report. Unfortunately, this field is not on the report node setup page and can easily be overlooked. If you have multiple report node definitions make sure to update this field for all of them in your refresh scripts. Also, If you make some changes to the report node definition this URI_RPT field get updated with the correct value.


P.S.: Applies to Tools 8.49. I have not looked into other releases

Tuesday, May 28, 2013

Weblogic as a web service

Weblogic won't start as a service? Here are a few steps to make it work
  •  Open up registry editor
  •  Navigate to HKEY_LOCAL_MACHINE > SYSTEM > CurrentControlSet > services >  HRDEV-PIA (your service name here) > Parameters
  •  Double click on CmdLine and paste " -server -Xms256m -Xmx256m -XX:MaxPermSize=128m -Dtoplink.xml.platform=oracle.toplink.platform.xml.jaxp.JAXPPlatform -classpath ";foobar,D:/Psoft/HRDEV\webserv\HRDEV\lib\ps_patch.jar;D:/Psoft/HRDEV\webserv\HRDEV\applications\peoplesoft\PSIGW\WEB-INF\lib\mail.jar;D:/Psoft/HRDEV\webserv\HRDEV\lib\portlet-api-1.0.jar;D:/Psoft/HRDEV\webserv\HRDEV\lib\pluto-1.0.1.jar;D:/Psoft/HRDEV\webserv\HRDEV\applications\peoplesoft\PORTAL\WEB-INF\lib\saaj.jar;D:/Psoft/HRDEV\webserv\HRDEV\applications\peoplesoft\PORTAL\WEB-INF\lib\xml-apis.jar;D:/Psoft/HRDEV\webserv\HRDEV\applications\peoplesoft\PORTAL\WEB-INF\lib\xercesImpl.jar;;C:\bea\patch_weblogic920\profiles\default\sys_manifest_classpath\weblogic_patch.jar;C:\bea\jdk150_04\lib\tools.jar;C:\bea\WEBLOG~1\server\lib\weblogic_sp.jar;C:\bea\WEBLOG~1\server\lib\weblogic.jar" -Djava.util.logging.config.file=D:\Psoft\HRDEV\webserv\HRDEV\applications\peoplesoft\logging.properties -Dorg.apache.commons.logging.Log=org.apache.commons.logging.impl.Jdk14Logger -Dweblogic.Name=PIA -Dweblogic.management.username=operator -Dweblogic.ProductionModeEnabled=true -Dps_vault=D:\Psoft\HRDEV\webserv\HRDEV\psvault -Djava.security.policy="C:\bea\WEBLOG~1\server\lib\weblogic.policy" -Dssl.debug=false -Dps_home=D:/Psoft/HRDEV  weblogic.Server"
  • Double click on path and paste  "C:\bea\WEBLOGIC92\server\bin;C:\bea\WEBLOGIC92\server\native\win\32;C:\bea\jdk150_04\bin;D:/Psoft/HRDEV\bin\server\winx86;D:/Psoft/HRDEV\verity\winx86\_nti40\bin"
  • Make directory changes as per your configuration
  • I have seen the error when path is abbreviated
 

Tuesday, January 22, 2013

Publishing Web Service and WSDL issue

if you get "PeopleSoft TargetConnector: Unable to decrypt the password" when trying to access WSDL means that the web server does not know of the default app server. Make sure the integration.properties file has the default app server information. If your setup involves multiple web servers, update the file on all of the web servers


Thursday, January 3, 2013

Installing PeopleSoft on Linux (OLE6 / Fedora 17)

Here are some of the issues I came across when installing PeopleSoft in Linux Environment

Issue: libjvm.so not found. Process Scheduler won't post to report repository and gateway connectors won't load
Resolution: environment variable LD_LIBRARY_PATH did not have jre in it. Make sure to add it. In my case it was $PS_HOME/jre1.6.0/lib/amd64/server. One very important thing to remember is to reconfigure process scheduler and App server both after making the environment variable change.

**********************************************************************************

Tuesday, December 18, 2012

Compiling COBOL on Windows

1. Open up command prompt
2. Set up following environment variables for the session
    • set PS_HOME=d:\psoft\HRSBX
    • set COBROOT="C:\Program Files (x86)\Micro Focus\Net Express 5.1\Base" 
3. Make sure to use quotes for COBROOT
4. Make a temporary directory somewhere
   mkdir d:\temp
4. Go to setup directory under PS_HOME
    cd %PS_HOME%\setup
6. cblbld D: \temp   (there is a space between D: and \temp)
7. It will compile cobol and move the binaries to cblbina directory

If you are getting compilation error for just about every cobol, make sure that the license has not expired. Unfortunately, the compiler does not indicate that the license has expired. You can verify that in Micro Focus License Management System
     

Thursday, November 8, 2012

Updating node definition with Database refresh

Make sure to truncate these tables:

DELETE FROM PSAPMSGPUBHDR;
DELETE FROM PSAPMSGPUBDATA;
DELETE FROM PSAPMSGPUBCON;
DELETE FROM PSAPMSGSUBCON;
DELETE FROM PSAPMSGPUBERR;
DELETE FROM PSAPMSGPUBERRP;
DELETE FROM PSAPMSGPUBCERR;
DELETE FROM PSAPMSGPUBCERRP;
DELETE FROM PSAPMSGSUBCERR;
DELETE FROM PSAPMSGSUBCERRP;
DELETE FROM PSAPMSGPCONDATA;
DELETE FROM PSAPMSGSCONDATA;
DELETE FROM PSIBLOGHDR;
DELETE FROM PSIBLOGDATA;
DELETE FROM PSIBLOGERR;
DELETE FROM PSIBLOGERRP;
DELETE FROM PSAPMSGARCHPH;
DELETE FROM PSAPMSGARCHPD;
DELETE FROM PSAPMSGARCHPC;
DELETE FROM PSAPMSGARCHSC;
DELETE FROM PSAPMSGARCHPT;
DELETE FROM PSAPMSGARCHST;
DELETE FROM PSIBLOGHDRARCH;
DELETE FROM PSIBLOGDATAARCH;


Update sender and receiver node in following tables:
PSIBRTNGSUBDEFN
PSRTNGDFNPARM
PSIBRTNGDEFN

Update PSIBRTNGSUBDEFN set SENDERNODENAME='HRSBX' WHERE SENDERNODENAME='HRPRD';
update PSIBRTNGSUBDEFN set RECEIVERNODENAME='HRSBX' WHERE RECEIVERNODENAME='HRPRD';
update PSIBRTNGSUBDEFN set SENDERNODENAME='FNSBX' WHERE SENDERNODENAME='FNPRD';
update PSIBRTNGSUBDEFN set RECEIVERNODENAME='FNSBX' WHERE RECEIVERNODENAME='FNPRD';

update PSRTNGDFNPARM set SENDERNODENAME='HRSBX' WHERE SENDERNODENAME='HRPRD';
update PSRTNGDFNPARM set RECEIVERNODENAME='HRSBX' WHERE RECEIVERNODENAME='HRPRD';
update PSRTNGDFNPARM set SENDERNODENAME='FNSBX' WHERE SENDERNODENAME='FNPRD';
update PSRTNGDFNPARM set RECEIVERNODENAME='FNSBX' WHERE RECEIVERNODENAME='FNPRD';

update PSIBRTNGDEFN set SENDERNODENAME='HRSBX' WHERE SENDERNODENAME='HRPRD';
update PSIBRTNGDEFN set RECEIVERNODENAME='HRSBX' WHERE RECEIVERNODENAME='HRPRD';
update PSIBRTNGDEFN set SENDERNODENAME='FNSBX' WHERE SENDERNODENAME='FNPRD';
update PSIBRTNGDEFN set RECEIVERNODENAME='FNSBX' WHERE RECEIVERNODENAME='FNPRD';

Update node name:
PSMSGNODEDEFN

update PSMSGNODEDEFN set MSGNODENAME='HRSBX' WHERE MSGNODENAME='HRPRD';
update PSMSGNODEDEFN set MSGNODENAME='FNSBX' WHERE MSGNODENAME='FNPRD';


Update trusted node:
PSTRUSTNODES
update PSTRUSTNODES SET MSGNODENAME='HRSBX' WHERE MSGNODENAME='HRPRD';
update PSTRUSTNODES SET MSGNODENAME='FNSBX' WHERE MSGNODENAME='FNPRD';

Update IBPASSWORD:
update PSMSGNODEDEFN set IBPASSWORD='XYZ'
WHERE MSGNODENAME in ('HRSBX','FNSBX');


Clear cache on the app server and make sure that the pub sub services are running.

Tuesday, July 31, 2012

WebProfile Tables (8.46)

These are the tables behind WebProfile Settings

SELECT * FROM PSWEBPROFILE
SELECT * FROM PSWEBPROFBROW
SELECT * FROM PSWEBPROFCOOK
SELECT * FROM PSWEBPROFDEF
SELECT * FROM PSWEBPROFHIST
SELECT * FROM PSWEBPROFNVP
SELECT * FROM PSWEBPROFPROP
 
PSWEBPROFNVP  stores Virtual Address(Load Balancer), XMLLINK userid and password, public access userid and password etc. These tables can save your life if you have messed up your web profile settings and cannot login through web  

Thursday, June 30, 2011

Formatting date and numbers in XML publisher

We had this requirement to display currency symbol along with the numbers. Negative numbers were required to be displayed in brackets(no sign). It is pretty easy  but sometimes it is the easy stuff that kills most of our time.

 Here are the steps:
1. Double click on the field to open up BI publisher properties.
2. In the formatting section make sure that the type is number
3. Enter $#,##0.00;($#,##0.00) for the format

PS Query converts date to character in 'YYYY-MM-DD' format. We needed to display in MM/DD/YYYY format. This can be done by modifying the query but I found it easier to make a slight change in the template.
Here is the trick : xdoxslt:ora_format_date(FIELDNAME,'mm/dd/yyyy')

Formatting Number as Money:  ?format-currency:AMOUNT_1;’USD’;'true'?
Page Break: ?split-by-page-break:?


Tuesday, May 17, 2011

Integration Broker and Proxy Servers

We recently moved our web servers to new Windows Server 2008 box (64 bit) for PT 8.51.08 upgrade. During testing we noticed that none of the Integration Broker modules were able to communicate with out of network web services. We kept getting "Host cannot be resolved" error. After getting the networking team involved we found out that new boxes were set up to use a proxy server. Well, after reading up peoplebooks and online forums I found out how to set up Integration Gateway to use proxy servers. It is very simple and here are the steps involved:
  1. Open up PS_HOME\webserv\WEBSITE_name\applications\peoplesoft\PSIGW.war\WEB-INF\integrationGateway.properties and search for "Proxy webserver section". In this section you would find ig.proxyHost and ig.proxyPort. Assign correct values to these fields and make sure to remove the '#' sign. You can also access this file online through peopletools > Integration Broker > Quick Configuration > Advanced Gateway Setup > Gateway Setup Properties. Default userid is administrator and password is password.
  2. Don't forget to restart the web server

Monday, August 9, 2010

Adding a tablespace in PeopleSoft (Tools 8.49.12)

After the DBA has created the table space, you need to add it to PeopleTools table to make it available for the App Designer. Follow these steps to do so
  1. Navigate to PeopleTools -> Utilities ->  Administration -> Tablespace Utilities
  2. Add another row in the grid, enter Tablespace name, Database name, Type and save. Type would be Regular for most cases. We have a few LOBs for file attachments.
You are done, new Tablespace should show up in App Designer now. If you are adding a new Tablespace just for indexes do not add it to the list of Tablespaces in Tablespace Utilities. Tablespace for indexes can be overriden in record definition. Follow these steps:
  1. Open up the record definition up in App Designer 
  2. Go to Tools -> Data Administration -> Indexs
  3. Select index and click on Edit DDL
  4. Go to your database section and select INDEXSPC and click on Edit Parm
  5. A new window will pop up and you need to enter the Tablespace name in the Override value field
  6. Keep in mind that this method overrides the tablespace only for the index you selected in step3.
Follow these steps if you want to change the tablespace for all newly created indexes (System Wide)
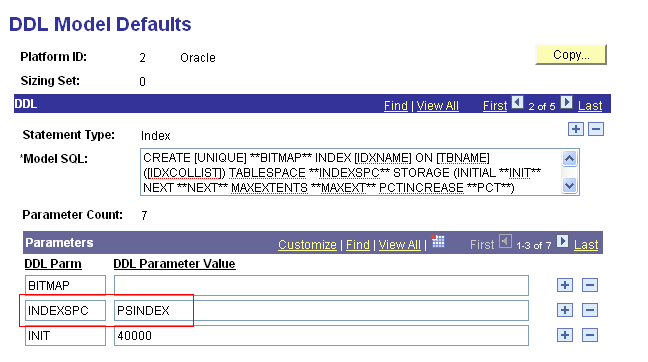
  1.  Navigate to PeopleTools -> Utilities -> Administration -> DDL Model Defaults
  2. Select your database type, scroll to indexes and change parameter INDEXSPC. See the screenshot below.

Friday, July 30, 2010

Handling Integration Broker Error

When integrating with third party applications you may get http 500 error which means that the request failed. It can fail for various reasons and you don't have access to the integrating systems all the time. It is a good practice to handle such errors so that users can see a simple message instead of a cryptic PeopleSoft message. Try Catch block does not handle this error very well and causes the application to error out. You can use system variable %IB_Status_Success to check if the request was successful. Here is a sample code : 


&Response_Msg = %IntBroker.SyncRequest(&Request_Msg);
If &Response_Msg.ResponseStatus = %IB_Status_Success Then
       /* Request was succesful , do response processing */
else
       /* Syncing failed,  do error handling */
      &Msg_Set = &Response_Msg.IBException.MessageSetNumber;
      &Msg_Number = &Response_Msg.IBException.MessageNumber;
      &Msg_Descr = &Response_Msg.IBException.ToString();
      &Fault_Data = &Response_Msg.GetContentString();
       /* You can write response in a file or look for logs on the gateway.  */
      &Response_File =  GetFile(&PS_HOME | " *.xml", "W", %FilePath_Absolute);
      &XML =CreateXmlDoc(&Fault_Data);
      &Response_File.WriteString(&XML.GenFormattedXmlString());
      /* You can display a message to the user here */
end-if;

P.S: Deafult path for Integration Broker error log  is
\\PS_HOME\webserv\peoplesoft\applications\peoplesoft\PSIGW\errorlog.html

Saturday, June 26, 2010

Security Certificate Installation in PeopleSoft environment

You know you need to install security certificates when you see messages like "HttpTargetConnector:PSHttpFactory init or setCertificate failed" in the integration broker log. Well, I had to spent couple of hours to figure that out. I am writing down the steps involved to install certificates so that you could save some time.

  1. Open the certificate from a browser and go the details tab. Export all the certificates in hierarchy by selecting them one by one and then clicking on export
  2. If you saved these certificates on a different machine move them to the Peoplesoft Webserver. Peoplesoft provides a utility called pskeymanager to manage security certificates. The executable resides in PS_HOME\webserv\peoplesoft\bin ( In PT 8.51 the executable is moved to  PS_HOME\webserv\peoplesoft\piabin )
  3. Type pskeymanager -import in a command prompt
  4. Enter password when prompted. Default password is password
  5. Enter alias for the certificate
  6. Enter path for the certificate
  7. You should see a message for successful import
  8. You have to import all the certificates in hierarchy
  9. Don't forget to restart the web server and you should be good to go
  10. If your web server hosts multiple environments, these certificates will be available to all of them